Thursday, August 12, 2010

In My Kitchen Laboratory


And now it's time to roll  up the sleeves and get down to the experimenting. I recycled my Sunbeam electric skillet and set the temperature to just under 200 degrees. The baggie of soy wax is shown at the front left , it comes in little flakes, and you can also see it in the skillet after it is melted and then cooled. It can be recycled for later use. I've included a closeup shot of some of my kitchen utensils used on the fabrics. You will have your own favorites, think creatively! This is an easy technique to try at home. I did refer to Melly's book (Inspired to Quilt by Melanie Testa) while I played. It gave me courage. I was inspired at the class at Art Unraveled and by Melly herself. Let me show you some of my samples.

This sample was started in class on ecru fabric. Wax was applied using a 3" long piece of foam. I was slightly intimidated by sticking the foam block into the wax, but it held up just fine. I would really recommend it as a tool to use. Ivory paint was applied vertically in areas, then ivory mixed with a purple Jacquard Neopaque was dry-brushed on around the wax. Another wax application, then copper metallic Lumiere was dry-brushed on. This is one of my very favorites. I did the finishing at home, including the copper application. It still feels a little waxier than I'd like, so I will iron it again, and if need be, I'll put it in the washing machine. Yummy.


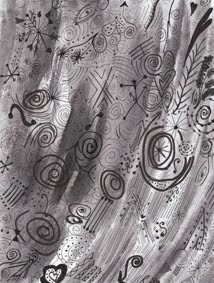
Left: Done completely at home with my personal potato masher, and (I'm so technical) the cap off a black marker, and the wrong end of a paintbrush. I  used a metallic russet and purple paints, then brushed wax over the entire surface with a bristle brush, allowed it to dry and then put black paint over the top of it all. This is a crackle technique that requires putting the piece in the freezer to allow the wax to crackle. Luckily for me, I watched very carefully as Melly did the demo on this technique in class and I was pleased with my results on this piece. In future endeavors, I will strive to obscure the potato masher somewhat, but again, I'm learning. The base fabric for this was an orange hand-dyed. Right: Base fabric was blue variegated hand-dyed. I used the kitchen tool that you use to hold the cheese or bread while you slice it, it has 3" prongs close together (aren't I specific?) It's in the center of the photo of the tools. The squares were done with the notched foam. I cut those notches with scissors.

This may be my most favorite! I began it in class with one of Melly's cookie presses on ecru fabric. I NEED MORE TOOLS! Isn't this cool? In it's finished form, it is salmon-colored with copper metallic Lumiere dry-brushed over it. The crackle technique is accomplished by brushing wax over the entire surface, letting it dry, freezing the sheet in the actual freezer, quickly making a long roll or tube of the piece and then running the hands down the length quickly to "crackle" the wax, dump the shards into the trash and then with turquoise Liquitex acrylic paint, cover the entire piece and let it cure 48 hours. I did burnish the turquoise into the fabric with the back of a spoon after I applied it. When the turquoise paint was washed away, the piece was ironed to set the paint and then thrown into the washing machine to remove any remaining wax. Dried and heat set for 10 seconds.  I started it in class as one of my early efforts and finished it at home. Lessons learned: I was rather spontaneous in my placement of the hearts, having no experience. The hearts should have been more randomly set or more perfectly. This way it looks as thought I tried to line them up and missed, when really I had no idea what they would like like when finished. The other thing I notice as I self-critique it in an effort to improve is that I really should use the tray idea under the implement to catch drips as I am carrying the utensil to the design. Specifically, see the excess light-colored areas on the two lower right hearts? This is what I'm referring to. It also could have occurred by not holding the tool stationary (wobbly hands, rotation of the tool, etc). At any rate, more experience is the cure for that. It is, I think the very first one I attempted, so we'll give me a break.

I know Melly will have more info on her website at wwwmelainetesta.com, if you're interested in learning more. 

Wednesday, August 11, 2010

Soy Wax Continued

Here is one of my first creations. It started as ecru fabric. I added soy wax with a square piece of foam and painted over it with turquoise Jacquard Neopaque paint. Next, I added more wax with 2 corks held by a long-handled fork, let it dry and applied more of the same paint. After letting it cure for 48 hours, I ironed the wax out and heat set the paint  with the iron. I then washed the fabric to further remove the wax. Lessons learned: Use a plastic butter container lid under the waxed corks to transport the melted wax to the work surface and avoid unsightly drips. (See bottom left) I'm very proud of this first effort.


This started its life as yellow fabric. The squares were made with a ravioli cutter. I used it to apply the first layer of wax, used the same paint as before after the wax was dry. The next layer of wax was applied with a piece of copper hollow pipe, perhaps one inch long, and held down in the wax pot by a pair of hemostats. I loved the circle effect created by the copper pipe. Next, another light coating of paint. And now the hard part, be patient and let the paint cure for 48 hours. Remove wax, heat set paint, and let everything dry.

This is such fun. What a class! What a teacher! What an event!


Monday, August 9, 2010

Soy Wax class with Melly Testa

Another glorious day at Art Unraveled. I've never worked with Soy Wax, so this is all new to me. I'm sharing some photos I took during class that you might find interesting... this first photo is a closeup of the wax pots. The second photo shows the wax pots and under the table you can see the kind we used in class, Presto Kettle Kooker and Steamer. It is available at Amazon and Walmart. 

The soy wax is used in candlemaking and has a low melting temperature (180 degrees) so it is safer for your washing machine and it is food grade. I've learned all of this from Melly, please don't think I knew a single thing about this before her class. But since my hometown is Decatur, Illinois, the soy bean capitol of the world, I felt compelled to learn this very creative technique. Soy wax is made from soybeans, after all. Then of course if you figure into the equation that it is so much fun, you know I have to experience it. I took the summer off from teaching to try new techniques, so ta da! Here's a new one for me, how about you? And if you want further information, get Melly's book, Inspired to Quilt or her DVD, Print, Collage, Quilt. Or both, like I did.


And here is a teaser, some of my fabrics in progress. They have had paint and then a layer of soy wax applied, using ordinary kitchen utensils like potato mashers and sponges. I'll have more to show later on, when I continue this process at home. 

Saturday, August 7, 2010

Picasso Dog

Today I took a class with Carla Sonheim at Art Unraveled based on her book Drawing Lab for Mixed Media Artists. I really enjoyed the exercises. Here is an image of my Picasso Dog. Note the torn background paper. For more information on the technique, check out her book on Amazon.com.

Friday, August 6, 2010

Traci Bautista at Art Unraveled


Today I met Traci Bautista at Art Unraveled, a mixed media event held every August in Phoenix. Traci is here teaching several of her classes. I am thoroughly enjoying her online class on Creative Doodling. I was excited to meet her and she was quite encouraging of my efforts. What I saw that attracted me the most was her large size graffiti-like pieces on drill cloth, which were about 2' x 3". I asked lots of questions and hope to create one of my own soon.

Tuesday, August 3, 2010

Black & White Basics


This doodle begins with a black watercolor background. Next is Speedball India Ink (which I haven't applied since college) and then the application of Pitt pens, black Primsmacolor pencil and a top layer of Sakura white gel pen and a "White Out" pen. That added an extra dimensional layer on the surface.  See it on the right image? It adds enormously.  The final image is enhanced with color.

Sunday, August 1, 2010

Photoshop Wonders


The view on the left is watercolor in yellow and orange with Prismacolor pencils and Pitt markers. I printed it on fabric using Printed Treasures by Millikin, then beefed up the color with pencils and markers before machine quilting it with yellow Bottom Line thread by Libby Lehman from Superior. I used the liquify filter in the distort menu on Photoshop Elements Six. Isn't it fun?